
-
Matte Black
-
Chrome
-
Brushed Gold
-
Brushed Nickel
- + 1

-
Brushed Gold
-
Matte Black
-
Brushed Nickel
-
Brushed Gold
-
Matte Black

-
Brushed Gold
-
Brushed Nickel
-
Chrome
-
Matte Black



Bathroom Sink Drain Size Guide: How to Measure and Choose the Right Type
The easiest way to buy the wrong bathroom sink drain is to choose by finish first. Two drains can look nearly identical from above while using different overflow openings, threaded lengths, flange diameters, stopper mechanisms, and plumbing connections below the sink.
The sink—not the faucet—decides which drain fits. Before comparing brushed gold, matte black, chrome, or oil-rubbed bronze, identify the drain opening and the space the assembly must pass through.
Bathroom sink drains are not universally interchangeable. A compatible drain must match the sink opening, overflow design, mounting thickness, flange coverage, stopper mechanism, and the connection to the plumbing below the sink.
Choose a Bathroom Sink Drain in This Order
Finish should be the last decision. Use this compatibility path before adding a pop-up drain or stopper to the cart.
-
Check whether the sink has an overflow
A sink with an overflow passage needs a drain body designed to receive that water. A sink without an overflow needs a drain without overflow slots.
-
Measure the actual sink opening
Compare the opening diameter with the compatible range in the drain specification. Do not assume that every bathroom sink uses the same opening.
-
Measure the mounting thickness
The threaded body must pass through the sink—and sometimes the countertop—while leaving enough thread for the gasket and locknut.
-
Choose the stopper mechanism
Decide whether the installation needs a push-button pop-up, a faucet-operated lift rod, or a continuously open grid drain.
-
Confirm the lower plumbing connection
Check the tailpiece diameter and how it connects to the P-trap before choosing the visible finish.
Bathroom Sink Drain Size Chart
A useful drain specification should show more than one diameter. Each measurement describes a different part of the installation.
| Measurement | What to Measure | Why It Matters |
|---|---|---|
| Sink drain opening | The inside diameter of the opening through the basin | Determines whether the drain body can pass through the sink |
| Top flange diameter | The visible flange that sits around the drain opening | Must cover the opening without interfering with the bowl shape or recess |
| Mounting thickness | The total thickness the threaded body passes through | Determines whether enough thread remains for the gasket and locknut |
| Usable thread length | The threaded section available below the sink | Prevents a drain from being too short for a thick basin or countertop assembly |
| Tailpiece diameter | The lower outlet that connects toward the P-trap | Must match the waste connection or an approved adapter |
| Overflow-slot position | The openings in the drain body that receive overflow water | Must align with the sink’s internal overflow passage when one is present |
No. Product listings may use common nominal plumbing connections, but the complete drain assembly is not universal. The sink opening, flange coverage, overflow design, mounting thickness, threaded length, and lower connection still have to match.
How to Measure a Bathroom Sink Drain
Measure the sink after removing the old drain whenever possible. Product photos and old trim caps do not reveal the dimensions that matter below the basin.
Clean the opening so the edges and full thickness of the sink can be measured accurately.
Measure across the actual drain hole rather than across the visible old flange.
Include every layer the threaded drain body must pass through before the locknut is installed.
Look for an opening near the upper wall of the basin and confirm that it connects to an internal channel.
Measure the existing lower connection and confirm whether an adapter is already part of the installation.
A lift-rod mechanism needs room behind the drain body for a pivot rod and linkage.
Look at the Drain From the Side, Not Just From Above
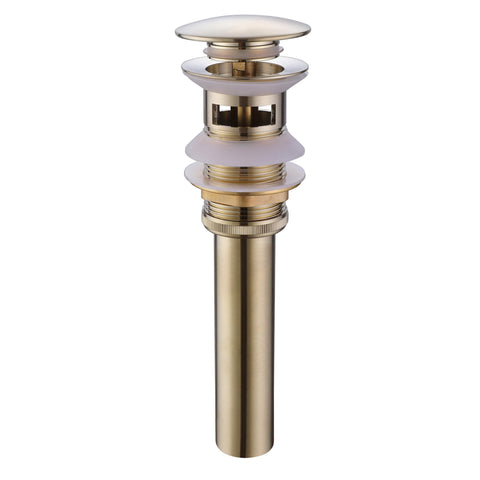
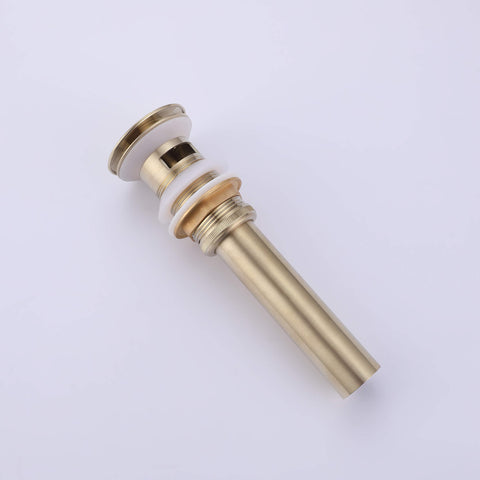
The visible stopper cap is only a small part of the drain. Below it, the body must pass through the basin, seal against the sink, receive overflow water where required, and connect to the trap.
Covers the sink opening and forms the visible upper sealing surface.
Opens and closes the drain, or remains open in a grid-drain design.
Receive water from the basin’s internal overflow passage when one is present.
Passes through the sink and provides room for the gasket and locknut.
Connects the drain assembly to the waste plumbing below the basin.
What a Useful Product Drawing Should Show
Compare every listed dimension with the actual sink. A matching finish or stopper diameter does not confirm that the hidden body will fit.


Sink Drain With Overflow vs. Without Overflow
A sink overflow is the opening near the upper wall of the basin. Inside the sink is a hidden passage that carries overflow water toward the drain body.
Drain With Overflow
Uses openings in the drain body so water from the sink’s internal overflow channel can enter the drain. Use it only when the sink has an overflow passage.
Drain Without Overflow
Uses a body without overflow slots. It is intended for a basin that has no internal overflow passage, which is common in some vessel-sink designs.
Do not decide by sink shape alone. Vessel, undermount, drop-in, and pedestal sinks may be manufactured with or without overflow. Inspect the actual basin.
Types of Bathroom Sink Drains and Stoppers
“Pop-up drain” is often used as a broad label, but several mechanisms work differently and need different space below the sink.
The stopper opens and closes when the cap is pressed. It does not need a lift rod behind the faucet.
Useful for compact vanities, vessel faucets, and faucets without a drain-control rod.
A rod behind the faucet moves a pivot rod connected to the stopper below the sink.
Useful when the faucet is designed with a lift rod and there is enough cabinet clearance for the linkage.
A perforated or slotted cover allows water to drain continuously and normally cannot hold water in the basin.
Useful when the sink should remain open rather than being filled and stopped.
The stopper or upper cap can be removed for cleaning and access to hair or debris near the drain entrance.
Useful when easy routine cleaning is a priority; confirm how the specific product is serviced.
Push-Button vs. Lift-Rod Pop-Up Drains
Choose Push-Button When
The faucet has no lift rod, the vanity is compact, or a direct press-to-close mechanism is preferred. Confirm that the stopper can be removed or serviced for cleaning.
Choose Lift-Rod When
The faucet includes a drain-control rod and the cabinet provides room for the pivot rod and linkage. The drain assembly must be compatible with that operating system.
Thread Length, Mounting Thickness, and Tailpiece Fit
A drain can match the sink-opening diameter and still fail to install because the threaded body is too short. This is especially important with thick ceramic sinks, stone basins, and some vessel-sink installations.
The lower connection must also match the plumbing below the sink. A nominal bathroom-sink connection does not guarantee that the existing trap, adapter, and wall stub-out are arranged the same way.
The drain body should not be used as the sole structural support for a vessel sink that requires a separate mounting ring or a defined countertop contact surface. Follow the sink manufacturer’s installation instructions.
Which Drain Fits Your Sink?
Use the sink condition and operating requirement to narrow the drain type before comparing finishes.
Choose a drain body with overflow slots and verify that their position works with the sink’s internal overflow passage.
Choose a drain made without overflow slots, then confirm the opening diameter and total mounting thickness.
Check drain-body length, bowl thickness, flange seating, and whether the sink requires a separate mounting ring.
Use a lift-rod-compatible pop-up and confirm there is enough cabinet space for the pivot rod and linkage.
Consider a push-button pop-up that avoids external linkage, while still matching the sink opening and trap connection.
Consider a continuously open grid drain instead of a closable stopper, subject to sink and plumbing compatibility.
Once you know the required opening size, overflow design, mounting length, and stopper type, compare bathroom sink drains.
Drain Body Material and Finish
Material affects the hidden assembly; finish affects the visible part inside the basin. A heavier metal body may provide a more rigid threaded connection, while mixed-material assemblies may use different metals for the body, stopper, and tailpiece.
Read the material specification for the complete assembly rather than assuming that the visible cap describes every component. Also check the manufacturer’s cleaning instructions before using acidic cleaners, abrasives, or metal brushes on a decorative finish.
Once compatibility is confirmed, match the visible drain finish with the faucet and nearby hardware for a coordinated vanity. Browse bathroom sink drains by fit first and finish second.
Why a New Bathroom Sink Drain Leaks
A new drain can leak even when the visible stopper operates correctly. The location of the water usually points to the part that needs to be checked.
The upper sealing surface may be dirty, uneven, incorrectly sealed, or fitted with the wrong product for the sink material.
The gasket may be reversed, pinched, misaligned, or tightened unevenly. Overtightening can also damage a gasket or sink.
The drain slots may not align with the sink’s overflow channel, or the overflow path may not be sealed as the product requires.
The lower connection, washer, nut, or adapter may not match the trap arrangement or may be cross-threaded.
Use plumber’s putty, silicone, gaskets, or other sealants only where the sink and drain manufacturers specify. After installation, fill and drain the basin while checking every connection.
Compatibility Checklist Before Buying
- Measure the actual sink drain opening
- Confirm with-overflow or without-overflow design
- Check the top flange coverage
- Measure the total mounting thickness
- Compare the usable threaded length
- Confirm tailpiece diameter and trap connection
- Choose push-button, lift-rod, or grid operation
- Check cabinet clearance for any linkage
- Confirm included gaskets, washers, and locknut
- Check how the stopper is removed for cleaning
- Review material and finish-care instructions
- Compare the complete side-view product drawing
When the drain arrives, compare it with the sink and product drawing before applying sealant. After installation, test the stopper and check the flange, overflow area, locknut, tailpiece, and trap for leaks.
For routine maintenance after installation, see the sink drain cleaning guide.
Bathroom Sink Drain Questions
Are bathroom sink drains universal?
No. The drain must match the sink opening, overflow design, mounting thickness, flange size, stopper mechanism, and lower plumbing connection.
What is the standard bathroom sink drain size?
Many bathroom sink assemblies use a nominal 1.25-inch lower connection, but the complete drain is not standardized by that number alone. Measure the sink opening and compare all product dimensions.
How do I measure a bathroom sink drain hole?
Remove the old drain and measure across the actual opening through the sink. Do not measure the visible flange or stopper cap.
Can I use a drain with overflow in a sink without overflow?
Use the drain type specified for the actual sink. Overflow slots and internal passages are part of the sealing and drainage design, so the two labels should not be treated as interchangeable.
What is the difference between a pop-up drain and a grid drain?
A pop-up drain has a stopper that opens and closes. A grid drain normally remains open and allows continuous drainage.
Is a push-button drain better than a lift-rod drain?
It depends on the faucet and cabinet. Push-button designs avoid external linkage, while lift-rod drains work with faucets designed to operate the stopper from above.
What drain should I use for a vessel sink?
Check whether the vessel sink has an overflow, then measure the opening, bowl thickness, required thread length, flange seating, and lower connection. Do not choose by “vessel sink” label alone.
Why is my new pop-up drain leaking?
Common causes include an incorrectly seated upper seal, a pinched gasket, uneven tightening, misaligned overflow slots, or a mismatched tailpiece connection.
Buy the Part Below the Finish
The visible cap may be the reason a drain catches your eye, but the hidden body determines whether it belongs in the sink.
Confirm opening size, overflow compatibility, mounting thickness, threaded length, stopper mechanism, and tailpiece connection first. Once those match, choose the finish that completes the bathroom and compare bathroom sink drains.